kubeadm 是 Kubernetes 官方提供的用于快速安装 Kubernetes 集群的工具,伴随 Kubernetes 每个版本的发布都会同步更新,通过实验 kubeadm 可以学习到 Kubernetes 官方在集群配置上一些新的最佳实践。
主机规划
系统为 CentOS Linux release 7.5.1804 (Core)
192.168.62.151 master 192.168.62.179 node01
系统环境准备
此步在 master 及 node 节点均操作
关闭防火墙、selinux和swap:
systemctl stop firewalld
systemctl disable firewalld

setenforce 0
sed -i "s/^SELINUX=enforcing/SELINUX=disabled/g" /etc/selinux/config


# Kubernetes 1.8 开始要求关闭系统的swap
swapoff -a
sed -i 's/.*swap.*/#&/' /etc/fstab
配置内核参数
cat > /etc/sysctl.d/k8s.conf << EOF
net.bridge.bridge-nf-call-ip6tables = 1
net.bridge.bridge-nf-call-iptables = 1
net.ipv4.ip_forward = 1
vm.swappiness=0
EOF
运行 sysctl --system 使其生效
配置源
此步在 master 及 node 节点均操作
配置国内yum源,分别运行:
mkdir /etc/yum.repos.d/bak && mv /etc/yum.repos.d/*.repo /etc/yum.repos.d/bak
wget -O /etc/yum.repos.d/CentOS-Base.repo http://mirrors.cloud.tencent.com/repo/centos7_base.repo
wget -O /etc/yum.repos.d/epel.repo http://mirrors.cloud.tencent.com/repo/epel-7.repo
yum clean all && yum makecache
配置 k8s 源
cat > /etc/yum.repos.d/kubernetes.repo  << EOF
[kubernetes]
name=Kubernetes
baseurl=https://mirrors.aliyun.com/kubernetes/yum/repos/kubernetes-el7-x86_64/
enabled=1
gpgcheck=1
repo_gpgcheck=1
gpgkey=https://mirrors.aliyun.com/kubernetes/yum/doc/yum-key.gpg https://mirrors.aliyun.com/kubernetes/yum/doc/rpm-package-key.gpg
EOF
配置 docker 源
wget https://mirrors.aliyun.com/docker-ce/linux/centos/docker-ce.repo -O /etc/yum.repos.d/docker-ce.repo
yum makecache fast
安装 docker
此步在 master 及 node 节点均操作
查看docker版号:
yum list docker-ce.x86_64  --showduplicates |sort -r

安装:
yum install -y --setopt=obsoletes=0  docker-ce-17.03.3.ce-1.el7
systemctl start docker
systemctl enable docker
修改docker cgroup driver为systemd
根据文档 CRI installation 中的内容,对于使用 systemd 作为 init system 的 Linux 的发行版,使用 systemd 作为 docker 的 cgroup driver 可以确保服务器节点在资源紧张的情况更加稳定,因此这里修改各个节点上 docker 的 cgroup driver 为 systemd。
- 创建并修改 /etc/docker/daemon.json:
# Set up the Docker daemon

cat > /etc/docker/daemon.json << EOF
{
"registry-mirrors": ["http://f1361db2.m.daocloud.io"],
"exec-opts": ["native.cgroupdriver=systemd"]
}
EOF
- 重启 docker 并查看 cgroup driver 配置
systemctl restart docker
docker info|grep Cgroup
安装 kubeadm、kubelet、kubectl、
此步在 master 及 node 节点均操作
yum install -y kubelet-1.14.3 kubeadm-1.14.3 kubectl-1.14.3
- Kubelet 负责与其他节点集群通信,并进行本节点Pod和容器生命周期的管理。
- Kubeadm 是 Kubernetes 的自动化部署工具,降低了部署难度,提高效率。
- Kubectl 是 Kubernetes集 群管理工具
运行 systemctl enable kubelet ,设置kubelet开机运行
部署 master 节点
此步在 master 节点操作
进行 Kubernetes 集群初始化
运行:
kubeadm init --kubernetes-version=1.14.3 --apiserver-advertise-address=192.168.62.151 --image-repository registry.aliyuncs.com/google_containers --service-cidr=10.1.0.0/16 --pod-network-cidr=10.244.0.0/16
-
kubernetes-version 参数是k8s版本
-
apiserver-advertise-address 是 master 节点的ip
-
pod-network-cidr是定义POD的网段(不用想这个网段是否存在,因为这是k8s的内部虚拟的网络)
PS:kubeadm init 很容易出错,如果出错可以运行 kubeadm reset 重置,然后就可以重新kubeadm init
如果集群初始化遇到问题,可以使用下面的命令进行清理:
kubeadm reset
ifconfig cni0 down
ip link delete cni0
ifconfig flannel.1 down
ip link delete flannel.1
rm -rf /var/lib/cni/
实际操作输出:
[root@master ~]# kubeadm init --kubernetes-version=1.14.3 --apiserver-advertise-address=192.168.62.151 --image-repository registry.aliyuncs.com/google_containers --service-cidr=10.1.0.0/16 --pod-network-cidr=10.244.0.0/16
[init] Using Kubernetes version: v1.14.3
[preflight] Running pre-flight checks
[preflight] Pulling images required for setting up a Kubernetes cluster
[preflight] This might take a minute or two, depending on the speed of your internet connection
[preflight] You can also perform this action in beforehand using 'kubeadm config images pull'
[kubelet-start] Writing kubelet environment file with flags to file "/var/lib/kubelet/kubeadm-flags.env"
[kubelet-start] Writing kubelet configuration to file "/var/lib/kubelet/config.yaml"
[kubelet-start] Activating the kubelet service
[certs] Using certificateDir folder "/etc/kubernetes/pki"
[certs] Generating "etcd/ca" certificate and key
[certs] Generating "etcd/healthcheck-client" certificate and key
[certs] Generating "etcd/server" certificate and key
[certs] etcd/server serving cert is signed for DNS names [master localhost] and IPs [192.168.62.151 127.0.0.1 ::1]
[certs] Generating "apiserver-etcd-client" certificate and key
[certs] Generating "etcd/peer" certificate and key
[certs] etcd/peer serving cert is signed for DNS names [master localhost] and IPs [192.168.62.151 127.0.0.1 ::1]
[certs] Generating "ca" certificate and key
[certs] Generating "apiserver" certificate and key
[certs] apiserver serving cert is signed for DNS names [master kubernetes kubernetes.default kubernetes.default.svc kubernetes.default.svc.cluster.local] and IPs [10.1.0.1 192.168.62.151]
[certs] Generating "apiserver-kubelet-client" certificate and key
[certs] Generating "front-proxy-ca" certificate and key
[certs] Generating "front-proxy-client" certificate and key
[certs] Generating "sa" key and public key
[kubeconfig] Using kubeconfig folder "/etc/kubernetes"
[kubeconfig] Writing "admin.conf" kubeconfig file
[kubeconfig] Writing "kubelet.conf" kubeconfig file
[kubeconfig] Writing "controller-manager.conf" kubeconfig file
[kubeconfig] Writing "scheduler.conf" kubeconfig file
[control-plane] Using manifest folder "/etc/kubernetes/manifests"
[control-plane] Creating static Pod manifest for "kube-apiserver"
[control-plane] Creating static Pod manifest for "kube-controller-manager"
[control-plane] Creating static Pod manifest for "kube-scheduler"
[etcd] Creating static Pod manifest for local etcd in "/etc/kubernetes/manifests"
[wait-control-plane] Waiting for the kubelet to boot up the control plane as static Pods from directory "/etc/kubernetes/manifests". This can take up to 4m0s
[apiclient] All control plane components are healthy after 16.001646 seconds
[upload-config] storing the configuration used in ConfigMap "kubeadm-config" in the "kube-system" Namespace
[kubelet] Creating a ConfigMap "kubelet-config-1.14" in namespace kube-system with the configuration for the kubelets in the cluster
[upload-certs] Skipping phase. Please see --experimental-upload-certs
[mark-control-plane] Marking the node master as control-plane by adding the label "node-role.kubernetes.io/master=''"
[mark-control-plane] Marking the node master as control-plane by adding the taints [node-role.kubernetes.io/master:NoSchedule]
[bootstrap-token] Using token: ojua0h.7np5r94k25uee59x
[bootstrap-token] Configuring bootstrap tokens, cluster-info ConfigMap, RBAC Roles
[bootstrap-token] configured RBAC rules to allow Node Bootstrap tokens to post CSRs in order for nodes to get long term certificate credentials
[bootstrap-token] configured RBAC rules to allow the csrapprover controller automatically approve CSRs from a Node Bootstrap Token
[bootstrap-token] configured RBAC rules to allow certificate rotation for all node client certificates in the cluster
[bootstrap-token] creating the "cluster-info" ConfigMap in the "kube-public" namespace
[addons] Applied essential addon: CoreDNS
[addons] Applied essential addon: kube-proxy

Your Kubernetes control-plane has initialized successfully!

To start using your cluster, you need to run the following as a regular user:

  mkdir -p $HOME/.kube
  sudo cp -i /etc/kubernetes/admin.conf $HOME/.kube/config
  sudo chown $(id -u):$(id -g) $HOME/.kube/config

You should now deploy a pod network to the cluster.
Run "kubectl apply -f [podnetwork].yaml" with one of the options listed at:
  https://kubernetes.io/docs/concepts/cluster-administration/addons/

Then you can join any number of worker nodes by running the following on each as root:

kubeadm join 192.168.62.151:6443 --token ojua0h.7np5r94k25uee59x \
    --discovery-token-ca-cert-hash sha256:f18310d886937edd0a048a5caa1b25a6f5e4951ebd384b018452be74d5d6c93c
把输出内容中 kubeadm join 这段话拷出来,后面 node 加入集群会用到
配置kubectl工具
mkdir -p /root/.kube
cp -i /etc/kubernetes/admin.conf /root/.kube/config
chown $(id -u):$(id -g) /root/.kube/config
- 查看集群状态
[root@master ~]# kubectl get cs
NAME                 STATUS    MESSAGE             ERROR
controller-manager   Healthy   ok
scheduler            Healthy   ok
etcd-0               Healthy   {"health":"true"}
- 查看到k8s集群的所有节点
[root@master ~]# kubectl get nodes
NAME     STATUS     ROLES    AGE     VERSION
master   NotReady   master   7m40s   v1.14.3

PS:在实际操作中发现,节点加入集群后,其status要等几分钟才变成ready(ready说明正常)
部署flannel网络 (deploy a pod network)
kubectl apply -f https://raw.githubusercontent.com/coreos/flannel/a70459be0084506e4ec919aa1c114638878db11b/Documentation/kube-flannel.yml
部署node节点
此步在 node 节点操作
kubeadm join 内容为前面执行完 kubeadm init 输出结果中最后一行内容。
kubeadm join 192.168.62.151:6443 --token ojua0h.7np5r94k25uee59x \
    --discovery-token-ca-cert-hash sha256:f18310d886937edd0a048a5caa1b25a6f5e4951ebd384b018452be74d5d6c93c
实际操作输出:
[preflight] Running pre-flight checks
[preflight] Reading configuration from the cluster...
[preflight] FYI: You can look at this config file with 'kubectl -n kube-system get cm kubeadm-config -oyaml'
[kubelet-start] Downloading configuration for the kubelet from the "kubelet-config-1.14" ConfigMap in the kube-system namespace
[kubelet-start] Writing kubelet configuration to file "/var/lib/kubelet/config.yaml"
[kubelet-start] Writing kubelet environment file with flags to file "/var/lib/kubelet/kubeadm-flags.env"
[kubelet-start] Activating the kubelet service
[kubelet-start] Waiting for the kubelet to perform the TLS Bootstrap...

This node has joined the cluster:
* Certificate signing request was sent to apiserver and a response was received.
* The Kubelet was informed of the new secure connection details.

Run 'kubectl get nodes' on the control-plane to see this node join the cluster.
集群状态检测
此步在 master 节点操作
运行 kubectl get nodes ,可见 node01 节点已加到集群
[root@master ~]# kubectl get nodes
NAME     STATUS   ROLES    AGE     VERSION
master   Ready    master   84m     v1.14.3
node01   Ready    <none>   4m35s   v1.14.3
创建Pod
(以nginx为例,注意这会占用 80 端口)以验证集群是否正常
[root@master ~]# kubectl create deployment nginx --image=nginx
deployment.apps/nginx created
[root@master ~]# kubectl expose deployment nginx --port=80 --type=NodePort
service/nginx exposed
[root@master ~]# kubectl get pod,svc
NAME                         READY   STATUS              RESTARTS   AGE
pod/nginx-65f88748fd-ww4hb   0/1     ContainerCreating   0          8s

NAME                 TYPE        CLUSTER-IP     EXTERNAL-IP   PORT(S)        AGE
service/kubernetes   ClusterIP   10.1.0.1       <none>        443/TCP        29m
service/nginx        NodePort    10.1.208.116   <none>        80:30578/TCP   4s
kubectl scale pod 扩容与缩容
kubectl scale deployment nginx --replicas 5    # 扩容
kubectl scale deployment nginx --replicas 3    # 缩容
kubectl describe 描述资源对象
kubectl describe nodes <node-name>  # 显示 Node 的详细信息
kubectl describe pods/<pod-name>    # 显示 Pod 的详细信息
查看 nginx-65f88748fd-ww4hb pod 详细信息
[root@master ~]# kubectl get po
NAME                     READY   STATUS              RESTARTS   AGE
nginx-65f88748fd-ww4hb   0/1     ContainerCreating   0          3m42s
[root@master ~]# kubectl describe pods/nginx-65f88748fd-ww4hb
Name:               nginx-65f88748fd-ww4hb
Namespace:          default
Priority:           0
PriorityClassName:  <none>
Node:               node01/192.168.62.179
Start Time:         Sun, 24 May 2020 12:49:50 +0800
Labels:             app=nginx
                    pod-template-hash=65f88748fd
Annotations:        <none>
Status:             Pending
IP:
Controlled By:      ReplicaSet/nginx-65f88748fd
Containers:
  nginx:
    Container ID:
    Image:          nginx
    Image ID:
    Port:           <none>
    Host Port:      <none>
    State:          Waiting
      Reason:       ContainerCreating
    Ready:          False
    Restart Count:  0
    Environment:    <none>
    Mounts:
      /var/run/secrets/kubernetes.io/serviceaccount from default-token-w7xcw (ro)
Conditions:
  Type              Status
  Initialized       True
  Ready             False
  ContainersReady   False
  PodScheduled      True
Volumes:
  default-token-w7xcw:
    Type:        Secret (a volume populated by a Secret)
    SecretName:  default-token-w7xcw
    Optional:    false
QoS Class:       BestEffort
Node-Selectors:  <none>
Tolerations:     node.kubernetes.io/not-ready:NoExecute for 300s
                 node.kubernetes.io/unreachable:NoExecute for 300s
Events:
  Type    Reason     Age    From               Message
  ----    ------     ----   ----               -------
  Normal  Scheduled  3m46s  default-scheduler  Successfully assigned default/nginx-65f88748fd-ww4hb to node01
  Normal  Pulling    3m46s  kubelet, node01    Pulling image "nginx"
按时间顺序查看事件
kubectl get event –sort-by=lastTimestamp
进入 pod
kubectl exec -it nginx-65f88748fd-ww4hb bash
部署 Dashboard
此步在 master 节点操作
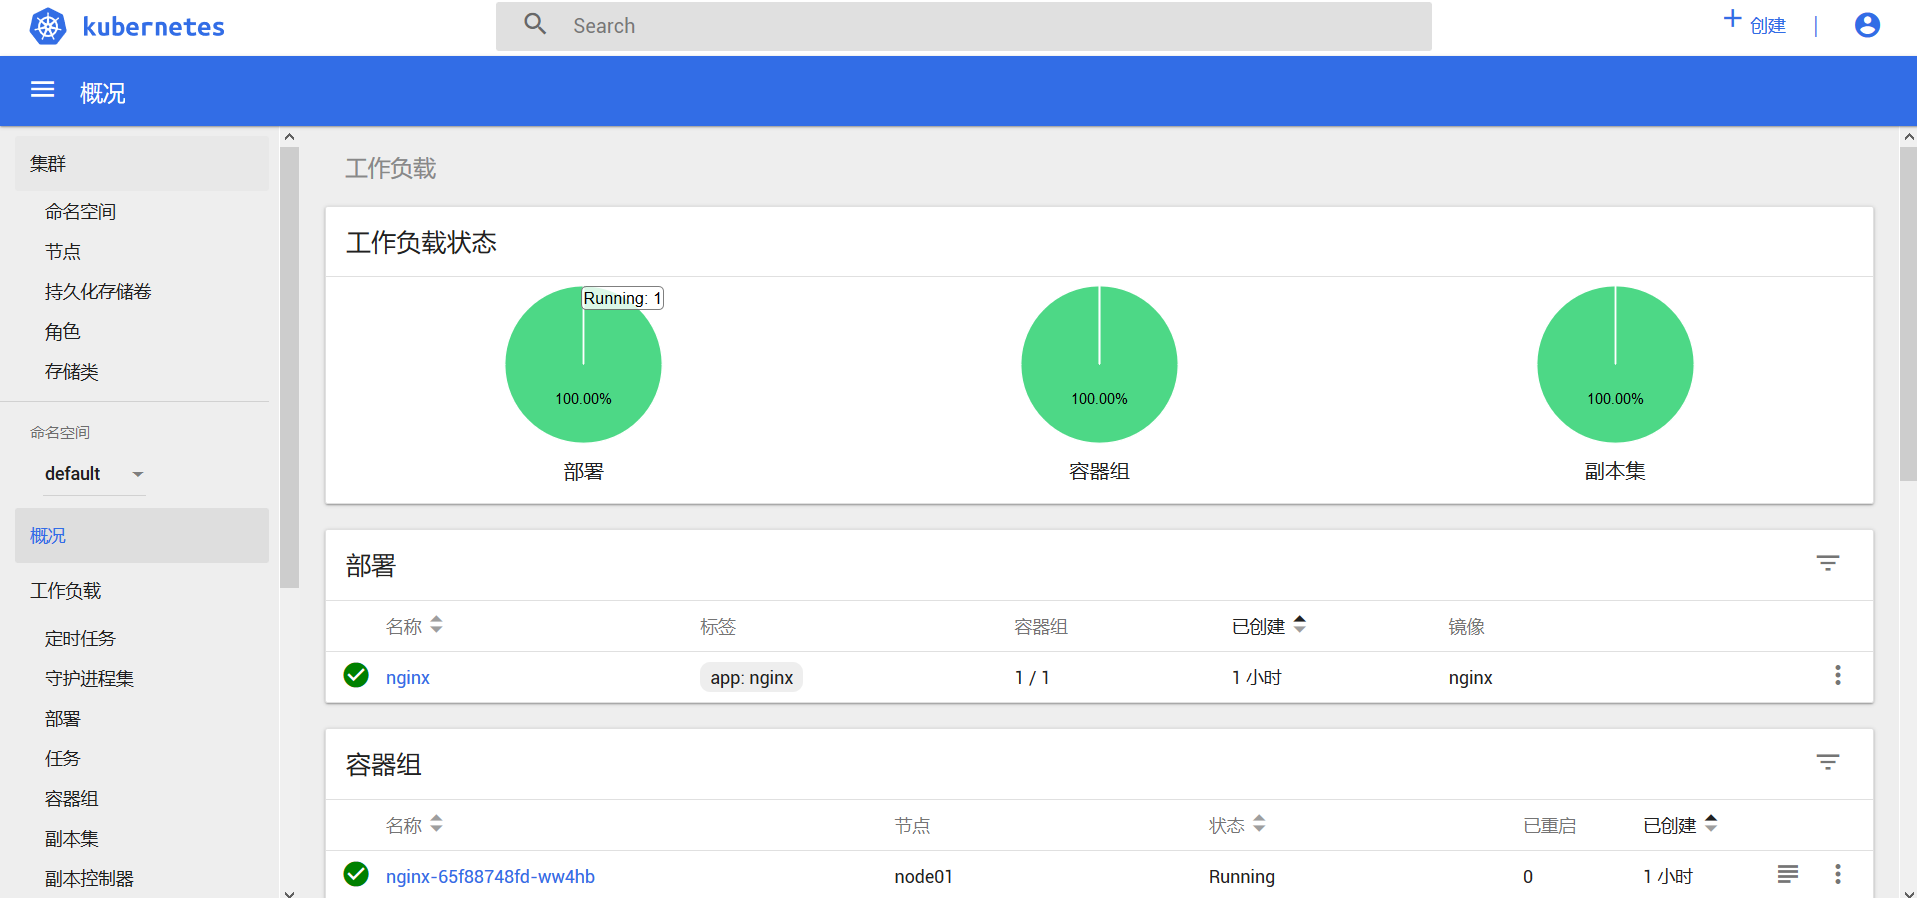
Dashboard是k8s自带的查看k8s集群运行信息的图形界面软件 PS:注意只可以查看而不能操作
创建 Dashboard 的 yaml 文件
其中,30001是Dashboard的端口
分别运行:
wget  https://raw.githubusercontent.com/kubernetes/dashboard/v1.10.1/src/deploy/recommended/kubernetes-dashboard.yaml
sed -i 's/k8s.gcr.io/loveone/g' kubernetes-dashboard.yaml
sed -i '/targetPort:/a\ \ \ \ \ \ nodePort: 30001\n\ \ type: NodePort' kubernetes-dashboard.yaml
部署Dashboard,运行:
kubectl create -f kubernetes-dashboard.yaml
检查相关服务运行状态,分别运行:
kubectl get deployment kubernetes-dashboard -n kube-system
kubectl get pods -n kube-system -o wide
kubectl get services -n kube-system
netstat -ntlp|grep 30001
创建用户以及获取用户的令牌(token)
分别运行:
kubectl create serviceaccount  dashboard-admin -n kube-system
kubectl create clusterrolebinding  dashboard-admin --clusterrole=cluster-admin --serviceaccount=kube-system:dashboard-admin
kubectl describe secrets -n kube-system $(kubectl -n kube-system get secret | awk '/dashboard-admin/{print $1}')
实际操作输出:
[root@master ~]# kubectl create serviceaccount  dashboard-admin -n kube-system
serviceaccount/dashboard-admin created
[root@master ~]# kubectl create clusterrolebinding  dashboard-admin --clusterrole=cluster-admin --serviceaccount=kube-system:dashboard-admin
clusterrolebinding.rbac.authorization.k8s.io/dashboard-admin created
[root@master ~]# kubectl describe secrets -n kube-system $(kubectl -n kube-system get secret | awk '/dashboard-admin/{print $1}')
Name:         dashboard-admin-token-lrxjb
Namespace:    kube-system
Labels:       <none>
Annotations:  kubernetes.io/service-account.name: dashboard-admin
              kubernetes.io/service-account.uid: 4826c284-9d89-11ea-af5e-02c89180627e

Type:  kubernetes.io/service-account-token

Data
====
ca.crt:     1025 bytes
namespace:  11 bytes
token:      eyJhbGciOiJSUzI1NiIsImtpZCI6IiJ9.eyJpc3MiOiJrdWJlcm5ldGVzL3NlcnZpY2VhY2NvdW50Iiwia3ViZXJuZXRlcy5pby9zZXJ2aWNlYWNjb3VudC9uYW1lc3BhY2UiOiJrdWJlLXN5c3RlbSIsImt1YmVybmV0ZXMuaW8vc2VydmljZWFjY291bnQvc2VjcmV0Lm5hbWUiOiJkYXNoYm9hcmQtYWRtaW4tdG9rZW4tbHJ4amIiLCJrdWJlcm5ldGVzLmlvL3NlcnZpY2VhY2NvdW50L3NlcnZpY2UtYWNjb3VudC5uYW1lIjoiZGFzaGJvYXJkLWFkbWluIiwia3ViZXJuZXRlcy5pby9zZXJ2aWNlYWNjb3VudC9zZXJ2aWNlLWFjY291bnQudWlkIjoiNDgyNmMyODQtOWQ4OS0xMWVhLWFmNWUtMDJjODkxODA2MjdlIiwic3ViIjoic3lzdGVtOnNlcnZpY2VhY2NvdW50Omt1YmUtc3lzdGVtOmRhc2hib2FyZC1hZG1pbiJ9.hOL3Rxkc_9mjM0UuobKrqirA-Lg1gkzMjBUXfqmL9RvXsOmgNc8qQa0u54ws5rziJZJwbmcFNUooIMZLfLbkkELdsY1_i2n6KFSD6T8ZP9U7iE665jVScueaHKYYQClHRyErP9A7O-SUKOosnrWbmbt15r9eo8G-QHLEJxfscqDJW1sCxlxAg_g5sTfG2kLgo9cg1RJAC1v3jtGrjLXyTu2A2WtVw7w-kCS7hqV6rjKZ8VNnN5S5UOS9tAp3nPsClpdiZIEMTIif6kCIvAvGrXolth2cFeukzh0JH2dmg8sUgau4ofrUKcxbZvNqMe7z7WWUdSNQPTq4MhgXvevdsasA
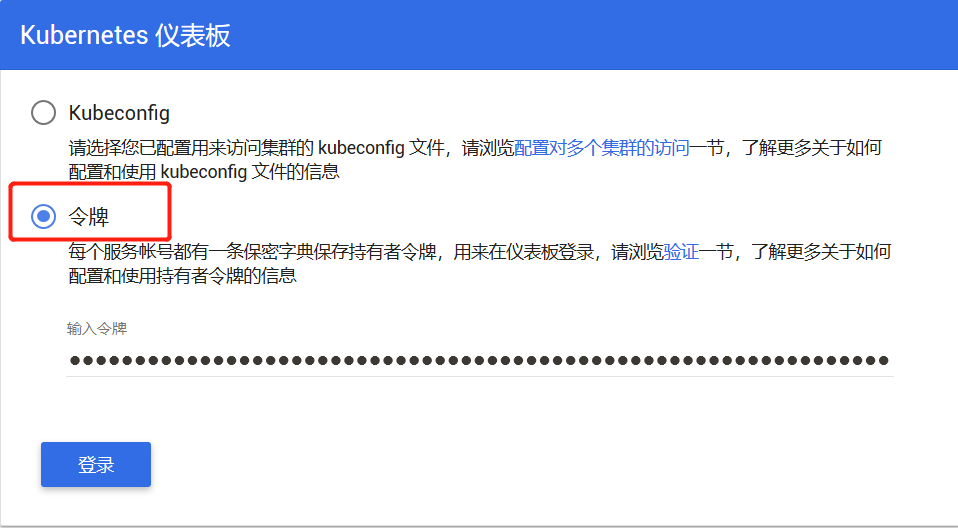
最后一行输出的 token 后面登录需要使用。
dashboard 登陆地址: https://192.168.62.151:30001/#!/login
使用 firefox(注意chrome和ie都不行)访问,IP地址是 master 的,令牌就是上面输出的 token 值
其他
kublet 启动失败排障
journalctl -xefu kubelet
journalctl -f -u kubelet
启动 kuebelet 报错
启动 kuebelet 报 driver: “cgroupfs” is different from docker cgroup driver: “systemd” 错
- 分析
在 kubeadm init 前若未修改 docker cgroup driver,之后修改其为 systemd 的话,即会报上述错误。
- 解决
修改 /var/lib/kubelet/kubeadm-flags.env ,将 cgroup-driver 的值改为 systemd
彻底卸载 k8s/docker/flannel
# Uninstall k8s

(Although on master node, I did this a few times and included draining the node the last time)

kubectl drain mynodename --delete-local-data --force --ignore-daemonsets
kubectl delete node mynodename
kubeadm reset
systemctl stop kubelet
yum remove kubeadm kubectl kubelet kubernetes-cni kube*
yum autoremove
rm -rf ~/.kube
rm -rf /var/lib/kubelet/*


# Uninstall docker:

docker rm `docker ps -a -q`
docker stop (as needed)
docker rmi -f `docker images -q`
Check that all containers and images were deleted: docker ps -a; docker images
systemctl stop docker
yum remove yum-utils device-mapper-persistent-data lvm2
yum remove docker docker-client docker-client-latest docker-common docker-latest docker-latest-logrotate docker-logrotate docker-selinux docker-engine-selinux docker-engine
yum remove docker-ce
rm -rf /var/lib/docker
rm -rf /etc/docker

# Uninstall flannel:

rm -rf /var/lib/cni/
rm -rf /run/flannel
rm -rf /etc/cni/
Remove interfaces related to docker and flannel:
ip link
For each interface for docker or flannel, do the following
ifconfig <name of interface from ip link> down
ip link delete <name of interface from ip link>
REF
在Centos7.6使用kubeadm部署k8s 1.14.3
CentOS 7.5 通过kubeadm部署k8s-1.15.0
/kubelet-failed-with-kubelet-cgroup-driver-cgroupfs-is-different-from-docker